

Ever wondered how to insert a copyright symbol in your document? Want to hide text? Customise grammar? Learn some quick editing tips to make the job quicker? Then check out these 12 cool MS Word tricks.
These are all simple tools designed to make your life easier. Learn how to get the most out of Microsoft Word and become a master.
1. Insert Special Characters
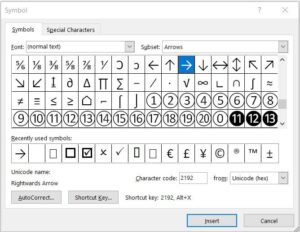
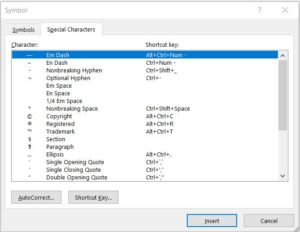
One of the great things about MS Word is you’re not limited to just text. It can insert symbols, icons, and special characters if you need it. These can include the copyright symbol, trademark symbol, em-dash, en-dash, numerals, international currency, arrows, ticks, office icons, emojis, designs, and much more!
To access:
Insert tab → Symbol → More Symbols.

The selection is split into two tabs: Symbols and Special Characters. Just select what you want and click ‘Insert’.
Many interesting symbols can be located under the font: Wingdings. In the ‘Subset’ field, the symbols are split into categories to narrow your search.
The Special Characters list their shortcut keys. Or you can create your own shortcuts for any object using the ‘Shortcut Key’ button.
2. Reveal Formatting
Ever have trouble aligning a bullet point? Or your text keeps breaking over a page? The ‘Reveal Formatting’ function can help you with that. It shows markers for page breaks, spaces, line breaks, fonts, indentations, etc. It can help you locate the reason you’re experiencing a problem (e.g. excess spaces in your document).
Press Shift+F1 to access. A box will appear on the right side of the page, displaying all the formatting attributes.
If you see something you want to alter (e.g. alignment) then click on the blue title. These are links that will take you to the appropriate tool to make changes.
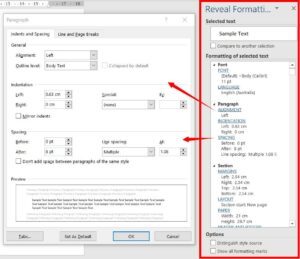
Using the ‘Show/Hide’ tool is also great for picking up on errors such as too many spaces. It shows all formatting marks within the document. If you’ve used spaces instead of a tab, hidden text, etc, this tool will indicate so.

Did you know you can place watermarks anywhere you want? Click here to learn how to manipulate watermarks to suit you!
3. Type Anywhere in Document
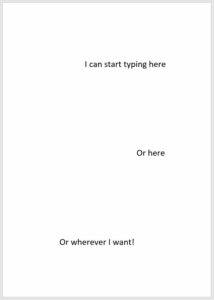
Not everyone is aware of this feature but it’s quite handy. You can double-click anywhere within your Word document and begin typing. Your cursor will set wherever you place it, without worrying about tabs.
You could begin in the middle of the page, at the bottom… whatever you like. Who says you’re restricted to top-left alignment?!
4. Smart Lookup
Why have more programs open than you need? Having a search engine in the background with a million tabs can slow your device. Trying using the ‘Smart Lookup’ function in Word instead.
This opens an ‘Insights’ pane on the right side of your page. It’s powered by Bing and will show relevant articles, images, definitions, and more. You may find the information you need without ever leaving your Word document. Otherwise, you have the option to explore further online by clicking on the links.
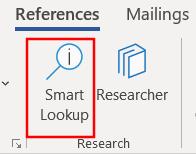
To access:
- Select the word you want to research.
- Go to References tab → Smart Lookup (or right-click and select from the drop-down list).
- Scroll through the list and click ‘More’ for more information.
- Check out the ‘Define’ tab for definitions.
Note: The Researcher tool is another handy function that helps you find credible sources and content for academic writing.
Ever used the Find/Replace tool? It’s more useful than you think – Discover more here!
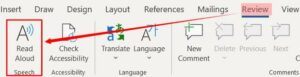
5. Read Aloud
When it comes to editing, I highly recommend this tool. Our brains can automatically insert letters and words that mightn’t be there (is, I, a, as). So, reading over your document can only edit so much. But the ears can pick up what the eyes miss.
The ‘Read Aloud’ function does exactly as it sounds. It has the capacity to play, pause, skip forward and backward. It comes in two voices (female Catherine or male James).
This tool is great for WH&S. It gives your eyes a break from scanning the same document, and the chance to stand up and stretch for a few minutes.
To access:
- Place your cursor where you want the reader to begin.
- Go to Review tab → Read Aloud.
- A control panel will appear on the right where you can operate it and change settings.
- To stop playing, click X on the panel or press the Read Aloud button again.

6. Hide Words
If you have sections in your document you don’t want everyone to read, you can hide the text. The process is surprisingly simple:
- Highlight the text you want to hide.
- Right-click → Font → tick the box ‘Hidden.’
- To un-hide, select all and tick the box again.
Note: another way to indicate the hidden text is to use the ‘Reveal Formatting’ tools (2).
You can also choose whether to print hidden text or not. To include all hidden text:
- File → Options → Display.
- Tick the box ‘Print Hidden Text.’
Learn various ways to protect your Word Document
7. Drop Cap
- Select the first letter at the start of your text.
- Go to Insert tab.
- Click on the Drop Cap button (in the Text group).
- Select ‘Dropped.’ This will enlarge the first letter and align with the main text.
- Or select ‘In Margin’ to align with the margin.
Discover here how to use and modify styles
8. Format Painter
With this tool, you can copy formatting from one word/sentence/section to another. It does it in bulk, so you don’t have to change individual elements such as font, size, colour, etc. This tool can save you a lot of time.
For example:
“This is a sample text.”
Now, I want to change this sentence to match the formatting above.
- Highlight the sample text.
- Home tab → Format Painter.
- A paintbrush icon will appear next to your cursor. Highlight the text you want to change. The Format Painter tool will automatically adjust it to match the sample text.
Have trouble with alignment? Learn about hanging indents.
9. Word Calculator
If you have something to calculate, you can do it without even leaving your document! Word has a built-in calculator for your convenience. Once you add it to your quick menu, it only takes a second to make a calculation.
To add the calculator:
- Click on the arrow beside your Quick Access Toolbar (top left corner).
- In the drop-down list, select ‘More Commands.’
- In the pop-up box, change ‘Popular Commands’ to ‘All Commands.’
- Search for Calculator → press Add → Ok.
- You will now see a circle symbol in the Quick Access Toolbar.
To use the calculator:
- On your document, type a sum you want to calculate (e.g. 450 – 231).
- Highlight the sum and press the calculator button.
- The response will appear in the bottom left corner of your page.
10 Insert Object
You can embed other documents into your work, such as Excel, PDF, or Word attachments.
This is handy if you want to give your reader the option to read additional information (without forcing them to scroll if they don’t). Or if your study assignments want you to include a copy of your first draft with the final product.

- Go to Insert tab → Object (in Text group) → Object.
- Select the second tab, ‘Create From File.’
- Press the ‘Browse’ button to locate the file you want to add.
- Tick the box ‘Display as Icon.’
- It will embed into your document and look like picture A, below.
- Readers simply double-click to open the document and read.
Picture A:
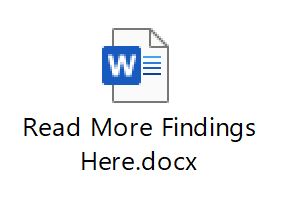
Note: if you tick ‘Link to File’ it will copy all the text into the body of your document.
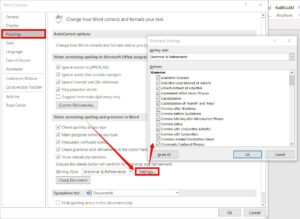
11. Customise Grammar Rules
Instead of using Word’s default grammar checker, you can customise it to suit you. Use it to pick up on passive voice, plural errors, jargon, and relative clauses (who vs which). And you can remove checks that you might find irrelevant to you.
To customise this:
- File → Options → Proofing.
- In the section ‘When correcting spelling and grammar in Word’, press the Settings button.
- In the ‘Writing Style’ drop-down list, select ‘Grammar & Refinement.’
- Tick the grammar options you want Microsoft to check and untick the ones you don’t.
- Press Ok.
12. Content Readability
Knowing how readable your document is can be very handy. It helps you:
- write to your specific target audience
- establish any reading difficulty levels
- cut unnecessary words and sentences
- decrease the risk of losing readership
- improve analytics and SEO rankings.
The Flesch Reading Ease calculates how easy the writing is to understand. It works on the average number of syllables per word and the average number of words per sentence. The higher the score, the easier it is to read.
Once you have the readability statistics activated, go to Review tab → Check Document.
Microsoft will run through the usual spelling and grammar check. Once it’s completed, it will display your readability statistics.
Click here for more on readability statistics & other tips.
Ribbon Add-ons
If you have sections in your document you don’t want everyone to read, you can actually hide the text. The process is surprisingly simple:
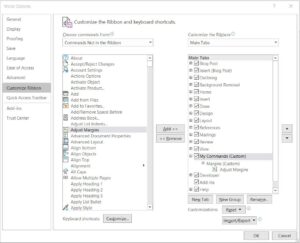
If you can’t find any of these tools in your top ribbon, you can easily add them on. Customise the ribbon with the tools and functions that suit you.
- Go to File → Options → Customize Ribbon.
- Under the right list (Main Tabs), press the ‘New Tab’ button.
- If you right-click you have the option to rename the new tab.
- Scroll through the list on the left (Popular Commands) to find new commands.
- Select what you want and press the ‘Add’ button → Ok.
- A new tab will appear in your top ribbon with your added commands.


This post is definitely full of useful tips about features that I didn’t even know MS Word could do. I use the Format Painter and Insert Symbols but the other 10 tips were completely new to me. My takeaway tips to start using immediately are the Calculator (I would resort to my phone calculator), Read aloud and Hidden text. Is there a similar post for Excel?
Hi Tamika, I’m glad you found this helpful. I use these tools all the time, and I find the Read Aloud particularly useful. I will be posting a similar article for Excel in the future, be sure to keep an eye out for it!
Wow, great site and useful tips CJ. Amazingly detailed and practical tips on Word. Who knew MS Word could Read Aloud?!? I have bookmarked your site. Keep the tips coming! I didn’t see an opportunity to subscribe for enews, but if it’s there you might reply. Really great work on your site – well done!!!
Hi John, thanks for your comments I’m glad you’re finding this site helpful! You can now subscribe at the bottom of this post, or via the sidebar, and get email notifications for every new post. More tips and tricks to come!
Hello,
I found out that your article is beneficial with many tips. I use Ms. Word but didn’t think about so many tricks it can do: customize grammar rules, drop cap, smart lookup, and many more. I am interested in Customize Grammar Rules; I am using Grammarly, and I am pleased with it. But, I wish to try something new or just use both of them (just in case).
Thank you for the helpful post. I will definitely try the tips and tricks using your article.
I’m glad you found this helpful. There are all sorts of tricks you can apply, I use both Word tools and Grammarly, love them both. Thanks for reading!
These MS Word tips and tricks are great especially if you are creating copy for a blog or website. I am going to bookmark this post for future reference until I am confident I can use these tricks from memory of course that will take time and practice. All 12 tips are great and you are right everyone should know them especially if you create copy for online consumption.
Thanks for your comments, Lee. Yes, these tools are especially handy for blogging. I’m glad you found them helpful!
I sincerely applaud the writer who posted these great and useful tips. I never knew MS word has so many features, customize grammar rules, drop cap, smart lookup, and many more. I will look more and learn about Grammar Rules and see how it works. I won’t try just Grammar rules but also look into more features because I really think this will teach more I really don’t know.
Everyone needs to have a view on this article and learn something from it. Thank you so much providing such a profitable article and I hope to see more articles from you.
I’m so glad you found this helpful, I appreciate the feedback. There will be more valuable tips in the future, so be sure to keep an eye out or subscribe. Thanks for reading!