

This program is full of amazing tools to modify your pictures. Discover various ways to use the crop tool in Photoshop to draw the reader’s focus, create headshots for your resume, and more.
What is the Crop Tool?
It’s a quick and easy way to remove unwanted excess and enhance your image. Among many things, it can be used to straighten, change perspective and create circular portraits.
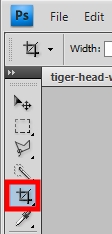
The crop tool is the fifth icon down in the left-hand toolbar.
How to Crop Using Crop Tool in Photoshop
1. Select the crop tool in Photoshop.
2. Drag the crop marquee around your picture to the size you want.

3. Press the tick button in the top ribbon (or press enter).

This post contains affiliate links, I may receive a small commission from any purchases made. This is at no extra cost to you. Click here to read the affiliate disclosure.
Rotate Your Crop
1. Drag the crop marquee around your picture.
2. When you place your mouse by the corner handle, a rotate icon will appear (double-ended arrow).

3. Rotate the marquee and press the tick button (or enter).
4. If you want to do precise 90-degree angles, hold down the shift key while you rotate.
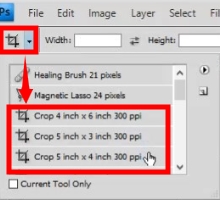
Crop Presets
1. When you select the Crop tool, a list of presets will appear in the top ribbon.
2. Click the drop-down list to make your selection, depending on what size you’d like to crop.
3. Drag the crop marquee over the image (you can rotate these too if you wish).
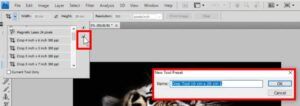
Or you can create your own:
1. Set the width, height and resolution in the top ribbon.
2. In the crop drop-down box, select the ‘New Tool Preset’ button on the right.
3. Create a preset name and click Ok.
If you’ve used a preset you don’t like, press the ‘Clear’ button in the top ribbon to reset.
Crop a Picture into a Circle
1. Open the image.
2. In the layers panel, double-click on the background layer to unlock it (you don’t need to rename it).
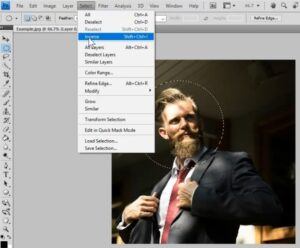
3. Select the circle Elliptical Marquee Tool from the left toolbar.
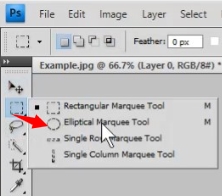
4. Drag your mouse over the image to make a circle marquee (use shift for a perfect circle).
5. Select → Inverse (shift+ctrl+I or right-click).
6. Press delete to erase the background you don’t want → Deselect (Ctrl+D).
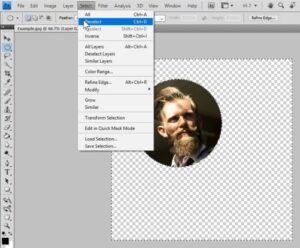
7. Crop to your preferred size and Save As.
Note – Save as .png format to ensure it saves with no background.

>> Learn how to create similar using Microsoft Word <<
Change Crop Perspective
You can also play with perspective while you crop.
1. Drag Crop marquee over the image.
2. In the top ribbon, tick the ‘Perspectives’ box.
3. Place your mouse on the corner handles and drag the crop marquee into your desired shape.
4. Press the tick button in the top ribbon (or press enter).

Other Tricks Using Crop Tool in Photoshop
How to crop an irregular shaped picture
1. Open the picture.
2. Go to the Layers panel and double-click on the background layer to unlock it.
3. Click the lasso tool and select the Polygonal lasso tool.
4. Click to make points around the picture in the shape you want to crop.

5. Place your mouse inside the shape and right-click → Select Inverse (or shift+ctrl+I).
6. Press delete to erase the background you no longer need, making it transparent.
7. Select → Deselect (ctrl+D).
8. Save the file.

For more crop tool functions, have a look at these helpful posts:
How To Straighten Crooked Photos In Photoshop
Photoshop Crop Tool Tips and Tricks


1 thought on “WAYS TO USE THE CROP TOOL IN PHOTOSHOP”