
Learn how to track changes in Word, using a simple editing tool to review your work with others.
What Does Track Changes in Word do?
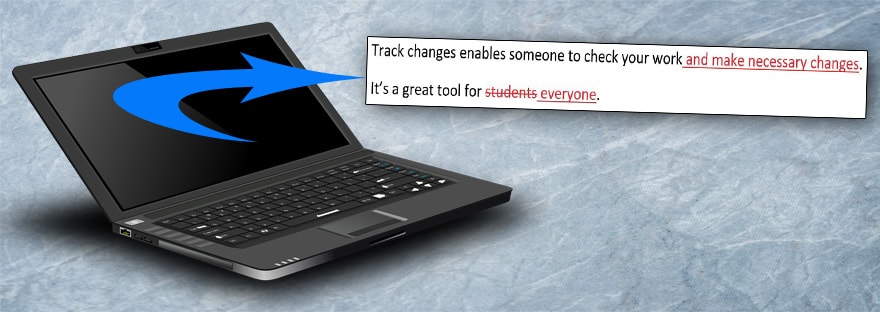
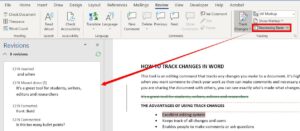
This tool is an editing command that tracks any changes you make to a document. It’s highly useful when you want someone to check your work as they can make comments and necessary changes. If you are sharing the document with others, you can see exactly who’s made what changes and when.
Follow these simple step-by-step instructions to learn how to track changes in Word.
The Advantages of Using Track Changes
- Excellent editing system.
- Keeps track of all changes and users.
- Enables people to make comments or ask questions.
- Speeds up the editing process.
- Doesn’t deface the original document.
- You can save feedback for future reference.
- On-screen changes are more legible than hand-written comments.
- The owner has the flexibility to accept or reject changes and delete comments.
- Great tool for students, writers, editors and researchers.
How to Track Changes in Word
Once you set Track Changes, it records any text you add, delete or reformat. It enables you to make comments or ask questions within any part of the document. Using this function, you can create edited versions of your original document.
Video breakdown: Track changes 0.08, Add Comments 0.55, Turn off Track Changes 1.22, Accept Changes 1.30, Reject Changes 1.50, Delete Comments 2.33, Viewing Changes 2.40, Markup Options 3.35.
Turn Track Changes On
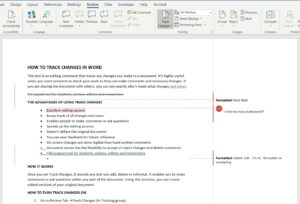
- Go to Review Tab →Track Changes (in Tracking group).
- Change ‘Simple Markup’ to ‘All Markup.’
Keyboard shortcut: Ctrl+Shift+E

What the different markups mean:
Simple Markup – shows red lines in the margin to indicate changes. Comments are symbolized with a speech bubble icon.
All Markup – shows all changes in detail.
No Markup – shows a preview of the changes implemented.
Original – shows the original document without the suggested changes.
View the video for demonstrations.
Track Changes Markers and Functions
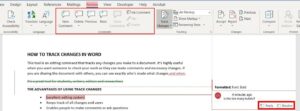
There will be a bar in the left margin noting any changes to the text. The changes you make in the document will show in different formats. Here are the different functions and how they appear:
Deletion – marked with a strikethrough and noted in the right margin.
Additions – marked with an underline and in a different colour.
Comments – are noted in the right margin.
Reformat text – are noted in the right margin.
Note: Different authors’ changes are shown in different colours.
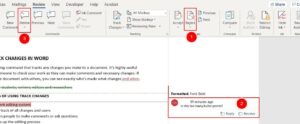
Make a New Comment
To make comments:
- Select the words/section you want to comment on.
- Review tab → New Comment (or right-click on the word)
The comment appears in the right margin with options to reply or resolve.
There’s even an option to ‘Ink Comment’ where you can write/draw in the comment box directly with a pen and eraser tool.
Review Track Changes in Word
Accept Changes
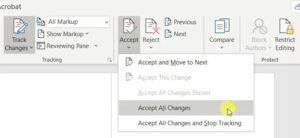
Go to Review Tab → Press the ‘Accept’ button (in Changes group).
Or select from the drop-down list:
- Accept and Move to Next
- Accept All Changes
- Accept All Changes and Stop Tracking
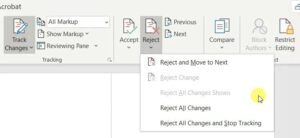
Reject Changes
This is next to the ‘Accept’ button (Changes group in Review tab).
Or select from the drop-down list:
- Reject and Move to Next
- Reject All Changes
- Reject All Changes and Stop Tracking
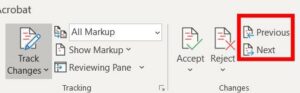
Previous and Next
You can use these buttons to move back and forth between the changes and comments.
Delete
You can delete changes as you come across them, such as comments. There are several ways to do this:
- Select the comment on your document → Review tab → Reject and Move to Next.
- Right-click on the comment itself → Delete comment.
- Select the comment on your document → Review tab → Delete or Delete All Comments.
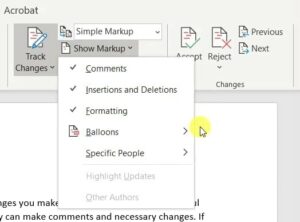
Show Markup
Here you can select which markups you want to see (comments, insertions and deletions, formatting).
You can select what changes you’d like to show as balloons. The default is comments and formatting only.
If you have several reviewers checking your document, you can select them individually or view everyone’s changes together.
View the video above for demonstrations.
Reviewing Pane
This command opens a pane that shows revisions of changes made. You can view it horizontally or vertically.
How to Turn Track Changes Off
Go to Review Tab → press Track Changes again.
Keyboard shortcut: Ctrl+Shift+E
Word will stop marking changes, but the coloured markers (strikethroughs and underlines) will remain visible.
>> Want more editing help? Consider Grammarly – Find out more here <<
Compare Track Changes in Word
You can compare documents to view changes between them.
- Review tab → Compare – select it again in the drop-down list.
- In the left box, browse and select your original document.
- In the right box, browse and select your newer version → Ok.
- Both document edits are shown with a Revision box highlighting the differences. You can then update it using Track Changes.

There’s also an option to combine the two documents:
- Go to Review tab → Compare → Combine
- This will create a new copy, leaving the original as it was
- Save the new copy → if it shows any revision marks, click the ‘Accept’ button.

Editing Made Easy
Once you’ve accepted/rejected changes, you’re presented with an updated version of your document. Be sure to save it under a new version number for future reference.
Track Changes is a great way to speed up editing while minimizing confusion and the risk of missing corrections. This function is designed to make the process as easy as possible. It’s definitely a tool I strongly recommend you use.
If you’d like more information on track changes, check out this article on advanced track changes options.

I used to track changes in Word quite a while ago now when I was at uni and it wasn’t a great experience. It’s good to see how this feature has improved over the years than being a red mess with lots of lines and balloons. I don’t often edit documents these days but I certainly feel more confident about tracking changes in Word after reading this post and watching the video. It’s good to have a reference to come back to as well, thanks ?
I’m glad you found it helpful Tamika 🙂 If you ever need to do a quick edit, you can also consider using Grammarly. It’s a very handy tool and it’s free. You can read more here: https://inspiredprofessional.net/feel-confident-with-grammarly/