

Discover ways to use the proofing tools in Microsoft Word more effectively. In the business world, your documents must be professional and free of glaring errors. Whether you’re writing a report, resume, article, or correspondence with customers, the same rules apply. It can make all the difference in landing a job, winning a client, and scoring a sale.
This article covers:
- correct spelling, grammar, clarity, and conciseness
- use the thesaurus
- use custom dictionary and custom autocorrect
- ignore web addresses
- change country spelling
- readability tests
- check jargon, complex words, passive invoice, and more
- tricks to using word count.
These tips make the editing process smoother and faster.
How to Use Proofing Tools – Spelling and Grammar
Using the Editor function ensures you don’t send out a document full of errors. It not only corrects misspelling, it also highlights grammatical errors, formats sentences, and confirms clarity and conciseness.
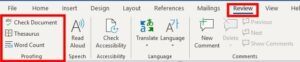
To access the proofing tools, go to the Review tab → Check Document.
PC Shortcut: F7
The bar at the bottom of the screen gives you a visual reminder of the editor. It displays the word count and a symbol to indicate when proofing errors exist. It also reveals what country spelling format it’s using.

What do the Coloured Wavy Lines Mean?
No doubt you’ve seen wavy coloured lines appear under certain words as you type. This isn’t random, it’s the automatic spelling and grammar function.
- Red line = misspelling
- Green line = grammatical error
- Blue line = inconsistent format
With this function, you can fix errors on the spot:
Right-click → spelling correction appears with options to ignore or add to the dictionary.

If you want to turn off this feature:
- File tab → Options → Proofing.
- Untick boxes such as:
- ‘Check spelling as you type’
- ‘Mark grammar errors as you type’
You can make further changes via the ‘Autocorrect Options’ button.
At the bottom of the proofing page, you can select whether to apply to one document or all future documents.
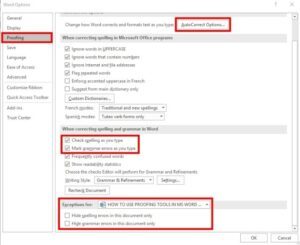
You can also access this via the settings in the ‘Check Document’ box.
Use Proofing Tools to Check Document
This is one of the most important proofing tools in MS Word.
- Review tab → Check Document.
- The editor box will appear on the right side of the screen.
- Editing is sorted into categories and subcategories:
- Corrections (spelling, grammar, etc.)
- Refinements clarity and conciseness

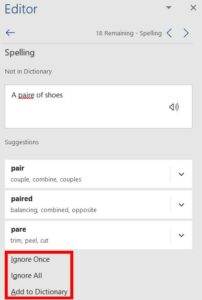
- You’re given suggested corrections and the option to ignore it or add to the dictionary. When you’ve made an action, it will take you to the next spelling/grammar error.
Tricks to Using the Editor More Effectively
You can customize several functions to make the editing process faster and more convenient for your needs.
Ignore All
You might have a certain word throughout your document that the editor is picking up as an error, but you don’t want to change it (e.g. spelling of a person’s name). In this case, select ‘Ignore All’ to skip it for the entire document check.
Custom Dictionary
Spell check works off the main dictionary, but it also has a custom dictionary. If a certain word is not included in the main dictionary, the editor will highlight this word. In this case, select ‘Add to dictionary’ and the editor will no longer prompt you about the word.
Custom Autocorrect
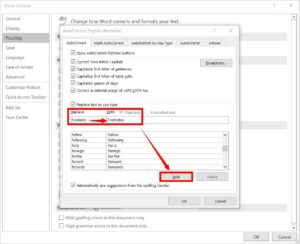
You can custom AutoCorrect settings for words you write often and tend to misspell. To do this:
- Click on the settings icon at the bottom of the editor box (or go to File → Options → Proofing tab).
- AutoCorrect Options.
- Add your own custom words (e.g. the way you tend to misspell it) then the correct spelling you want to replace it with.
Eliminate Complex Words
This command makes the editor check your document for overly complex words.
- Click on the settings icon at the bottom of the editor box (see image below).
- Click on the settings button ‘When Correcting Spelling & Grammar in Word.’
- In the list under ‘Clarity and Conciseness’ tick ‘complex words.’
Skip Jargon
Jargon and technical terms often show in the editor. It’s best to eliminate these so you don’t confuse readers and lose your audience. To do this, follow the same steps as above. In the list under ‘Clarity and Conciseness’ tick ‘jargon.’
Passive Voice
These days, a lot of writing calls for the active voice rather than the passive voice. This makes content more concise.
Example:
Passive – the light globe was changed by John.
Active – John changed the light globe.
To activate this, follow the same steps for complex words and jargon, but this time tick ‘Passive Voice’.
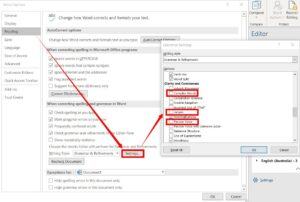
You can use these settings to check all sorts of things: slang, clichés, unnecessary commas, weak verbs, etc.
This post may contain affiliate links, I may receive a small commission through purchases made on my site. This is at no extra cost to you; it simply keeps this site up & running. Click here to read more.
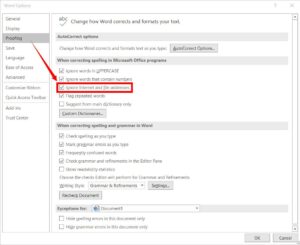
Ignore Web Addresses
You can prevent the Editor from stopping at every URL/web address. To check this:
- Click on the settings icon at the bottom of the editor box (opens Proofing tab).
- Make sure ‘Ignore Internet and file addresses’ is ticked.
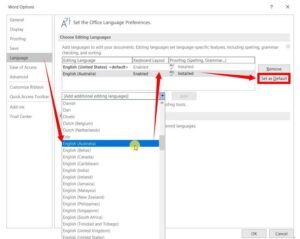
Change Country Spelling
You can add your own country spelling to the Language Preferences:
- File → Options → Language tab.
- Go to the ‘Add additional editing languages’ drop-down list and select your preferred language (e.g. English-Australia).
- This appears in the top box → click on ‘Set as Default’ button.
- If you want to remove it, simply highlight it and press the ‘Remove’ button.
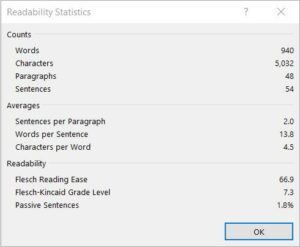
Check Your Document’s Readability Statistics
Why do this? It helps determine how easy your document is to understand. You can check that your writing is suitable for your target audience. If it is too advanced, your readers might have trouble following and lose interest.
You can add a feature, so the Editor displays readability statistics:
Flesch Reading Ease test – rates text out of 100 points. The higher the score, the easier the document is to understand.
Flesch-Kincaid Grade Level test – rates text on school grade levels. If it shows 7.0 then a seventh-grader can understand it.
To access this:
- File → Options → Proofing tab.
- Tick ‘Show Readability Statistics’ → Ok.
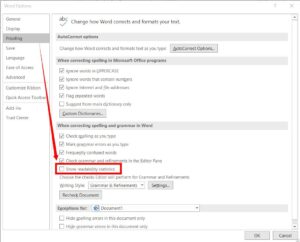
- Run the spellcheck (Review → Check Document).
- When the Editor has run through the spelling and grammar, it will then display the readability statistics.
Find out more about Flesch-Kincaid readability tests here.
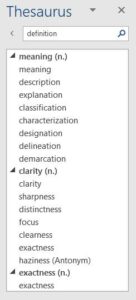
Thesaurus Proofing Tool
You can use this tool to find words of the same meaning. It’s handy if you don’t want your document to sound repetitive, or you’re not sure of a definition, or simply want to expand your vocabulary.
To access this, go to Review tab → Thesaurus.
PC Shortcut: ctrl+shift+G
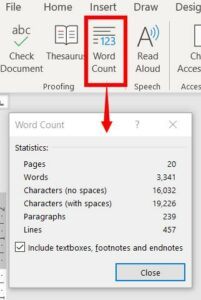
Word Count Proofing Tool
There are many advantages to using word count. You might be assigned a word limit for your essays, articles, and business reports. Using this tool can prevent your document from being ‘too wordy.’ It helps your writing be more focused and concise, keeping the reader’s attention.
To access this, go to Review tab → Word Count.
You can also view the word count at the bottom of your screen (see image 2).
PC Shortcut: shift+F7
Tricks to Using the Word Count
Count Words in a Specific Section
Select the section (e.g. a sentence) you want a word count for. If you want to do it for several paragraphs, hold down the ctrl key while you select. Click the ‘Word Count’ button and it will show you statistics for your selections rather than the whole document.
Note: the same method applies when counting words in a text box.
Include Words in Footnotes and Endnotes
To include these, press the ‘Word Count’ button and make sure the box ‘include text boxes, footnotes, and endnotes’ is ticked.
Insert Word Count into Your Document
You can insert the word count statistics into your document if you wish.
- Insert tab → Quick Parts (in the Text group).
- Field→ from the list, select ‘NumWords.’.
Make Life Even Easier with Grammarly!
Be consistent with your spelling and grammar everywhere!
Grammarly is a proofreading tool for emails and messages, documents, projects, and social media. Use it to check your writing across the web.
It has a free and premium version, and it checks grammar, spelling, punctuation, vocabulary, conciseness, formality, plagiarism, sentence structure, and more.You can add Grammarly to Chrome for free and start using it right away. With this tool, you needn’t worry about errors in your email to the boss or letters to clients.

1 thought on “HOW TO USE PROOFING TOOLS MORE EFFECTIVELY – MS WORD”