

Setting up documents has never been easier. Discover how the Styles feature can work for you. Use built-in formats or modify styles in Microsoft Word. Fast formatting with fewer complications!
Learn how to:
- Apply Styles
- Modify Styles
- Create new Styles
- Remove Styles
- Restrict Styles
- Use Styles for Table of Contents
- View Styles in Navigation Pane
What Are Styles?
The Styles feature is a combination of formatting instructions to design your document in a specific way. It structures the document with headings, subheadings, and sets the font, size, colour, spacing, etc.
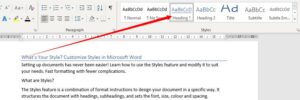
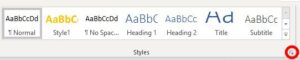
The styles gallery is in the top ribbon on the ‘Home’ tab.

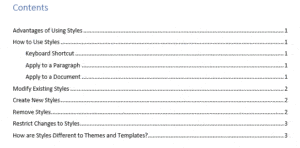
Advantages of Using Styles
- Save time manually formatting text and paragraphs.
- Easily set up templates and company styling sheets.
- Use it to identify document sections in the navigation pane.
- Consistent headings and subheadings.
- A fast, simple way to create a table of contents.
- Make uniform changes throughout the document using style cascade formatting.
- Can lock format changes to prevent any interference from other users.
How to Use and Modify Styles in Microsoft Word
Keyboard Shortcut
Press ctrl+shift+s for a pop-up box to apply styles.
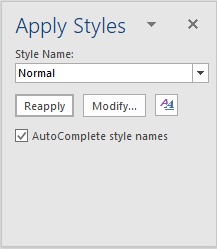
Apply to a Paragraph
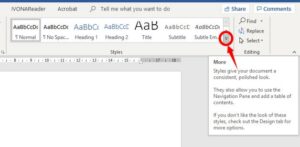
Place cursor in the paragraph → go to the ‘Styles’ gallery → select preferred style.
To view the whole selection in the Styles gallery, press the drop-down arrow ‘More.’
To apply to several paragraphs, select all the text you want to format and repeat the above step.
Apply to a Document
Home tab → Select all (or ctrl+a) → select preferred style from the Styles gallery.


How to Modify Styles in Microsoft Word
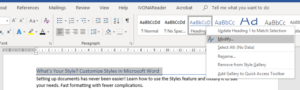
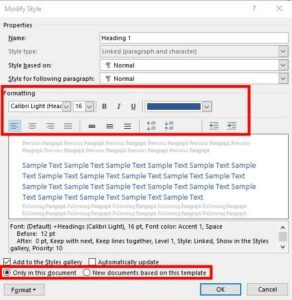
- Place your cursor on the text you want to modify, e.g. the title.
- The existing Style will be highlighted in the Styles gallery, e.g. ‘Heading 1’.
- Right-click on the Style name → Modify.
- Modify as you wish (size, font). At the bottom of the box, you have the option to apply changes to this document only or all future documents. Make your selection → Ok.
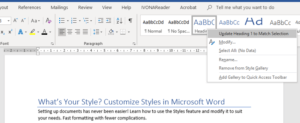
Another method is to select your text:
Right-click on the Style name → Select ‘Update (Style name) to Match Selection.’
Modify Styles in Microsoft Word – Quick Style Set
The Quick Style Set is made up of headings, titles, and body text styles that work well together. You can choose different Style sets in the Design tab. When you click on a Quick Style set, the styles in the Style gallery (in the Home tab) will change.

Create New Styles
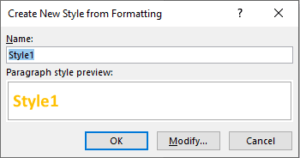
- Right-click on the text you want to create a style for.
- A pop-up box will appear → Styles → Create a Style.
- In the ‘Create New Style from Formatting’ box, you can modify it if you wish. Otherwise, give it a name and press ‘Ok’.
Your style will appear in the Style gallery like this:

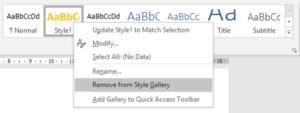
Remove Styles
To remove the style from the gallery, simply right-click and select ‘Remove From Style Gallery.’
To delete the style altogether:
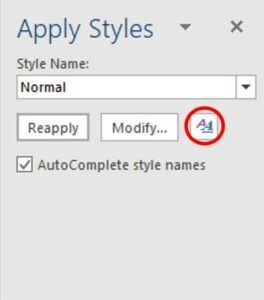
1. Click the button in the bottom corner of the Styles gallery.
Or access the ‘Styles’ button via shortcut ctrl+shift+s.
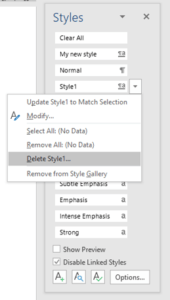
2. Click the drop-down arrow beside the Style name → select ‘Delete…’
Restrict Changes to Styles
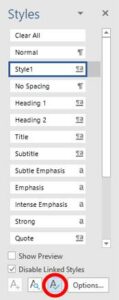
- Access the ‘Styles’ box (same as the previous steps).
- Select the style you want to restrict, e.g. ‘Style1.’
- Click on ‘Manage Styles’ button.
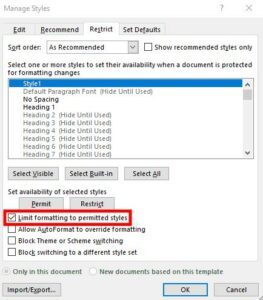
4. Tick ‘Limit Formatting to Permitted Styles’ and users won’t be able to format the text directly → Ok.
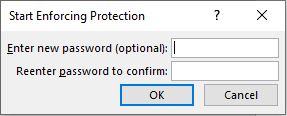
5. You are given an option to have a password. This is handy if you want a certain user to have access. If you don’t want to do this, press ‘Ok.’
6. The style is still visible in the Styles gallery, but the formatting tools are not accessible.

If you want to restrict the style altogether:
- Follow steps 1-4 above.
- In the ‘Manage Styles’ box, press the ‘Restrict’ button.
- Ok.

The ‘Style1’ will no longer be visible in the Styles gallery.
How to Use Styles for Table of Contents
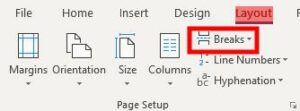
1.Go to the Layout tab → insert a page break.
2. Reference tab → Table of Contents → Automatic table 1.
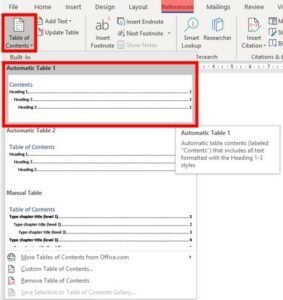
3. This will design a table based on all text that was formatted with Style Headings 1-3.
For example:
Heading: ‘Advantages to Using Styles’ – Style Heading 2
Subheading: ‘Keyboard Shortcut’ – Style Heading 3.
- If you’ve used other styles, you can select ‘Custom Table of Contents.’
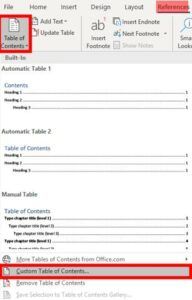
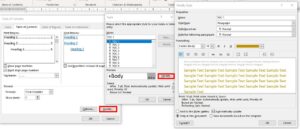
- In the ‘Table of Contents’ box, press the ‘Modify’ button. You can choose different styles, even modify them further if you wish.
How to View Styles in Navigation Pane
The Navigation Pane is a handy way to see all your Heading Styles at a glance. As you scroll through your document, it will highlight which heading section you’re up to.
View tab → tick the ‘Navigation Pane’ box.

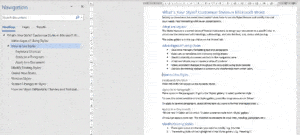
To move a section:
Click on a heading in the Navigation Pane → left-click and drag it to a new position on the list.
How are Styles Different from Themes and Templates?
Styles – is a quick way to change text formatting in your existing document.
Themes – redesigns the whole document, matching colours, fonts, and text boxes to create a ‘theme’.
Templates – are predefined documents with complete formatting; you just enter your own text. Resume templates are a good example.
Find Your Style
As you can see, it’s worth learning how to modify styles in Microsoft Word. The best way to familiarise yourself with the feature is to use it regularly. Experiment by creating your own for different types of documents. Using Styles not only saves you time but also keeps your documents consistent with a polished and professional look.

2 thoughts on “MODIFY STYLES IN MICROSOFT WORD TO SUIT YOU”