

Ever wonder how you can manipulate watermarks in Microsoft Word to suit you? Learn tricks, like how to add watermarks to selected pages only – this is particularly handy for business reports. Want to use a logo instead of text? Then read on, as this article covers:
- Inserting a watermark
- Changing size/shape
- Using logos/pictures
- Adding to selected pages
- Adding to columns
- Troubleshooting
What is a Watermark?
Watermarks in Microsoft word are used to highlight certain attributes of the document. For example, informing the reader it’s a first draft or confidential. The standard watermarks are:
- Do not copy
- Confidential
- Draft
- Sample
- Urgent
- ASAP
They’re usually horizontal or diagonal text. They automatically appear on every page, but this can be easily altered.
Watermarks give clear instruction in a simple way. They’re great for establishing different draft copies. And they add a professional touch to your document using logos.
Check out this video, and read on for step-by-step instructions:
Video breakdown: Add watermark 0.30 Change design 0.55 Change text 1.32 Reshape 1.53 Pictures 2.18 Logos 3.09 Shades 3.35 Remove from front page 3.55 Remove from selected pages 4.20 Odd and even pages 4.50 Change watermark on a single page 5.43 Add to columns 6.30 Remove 8.46
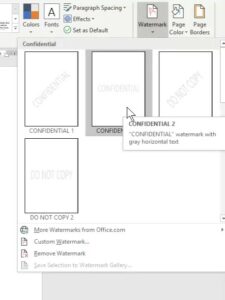
How to Add Watermarks
Inserting watermarks in Microsoft Word is fast and easy.
1. In the top ribbon, select the ‘Design’ tab → select watermark (top right).

2. A drop-down list gives you a selection to use.
How to Manipulate a Watermark
Go to Design tab → Watermark → from the drop-down list, select ‘Custom Watermark’.
Change Size/Shape
A pop-up box will appear called ‘Printed Watermark’. Here you can change the size, font, colour, even language. You can also switch the text direction from horizontal to diagonal.

The ‘Text’ box gives you a list of choices to use. Or you can type in your own text.

Edits can be done through the header too. Once your watermark is selected, you can further modify it:
- Double-click in the header area.
- Move your mouse over the text until it turns into a cross.
- Hold down your left mouse button. This allows you to drag the text anywhere on the page.
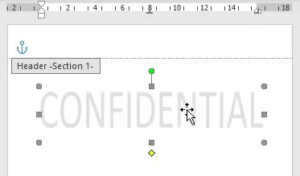
- Resize it by using the grey handles.
- Rotate it using a circle tool which appears when you hover over the green handle.

Change Watermark to a Picture
Watermark → Custom Watermark → Picture Watermark → press the ‘Select Picture’ button.
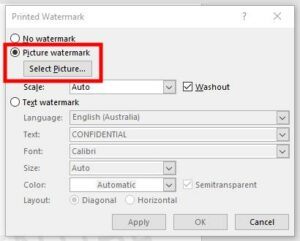
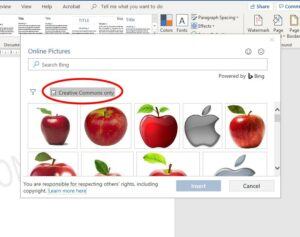
This will bring up an ‘Insert Pictures’ box, which gives you the option to:
- Choose a picture from your computer.
- Choose a picture from the Bing search engine.
- Choose a picture from your files in One Drive.
Note: for option 2, make sure the creative commons box is ticked to avoid copyright issues.
What is a creative commons license? It allows people to reuse, add to and share the content legally, under certain conditions. You can learn more here.
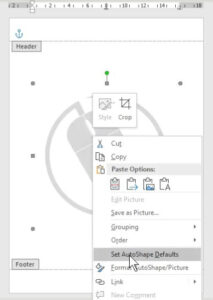
Use a Logo
To use a logo, choose option one and select it from your computer files.
![]()
If you want to make more subtle adjustments, follow these steps:
- Double-click on the header and hover over the watermark text
- Right-click and select ‘Format Autoshape/Picture’
- In the picture tab, you can change the colour or make it darker by adjusting the contrast.
If you don’t want any washout effect on your logo, go to ‘Custom Watermark’ and untick that option. Or you can untick ‘Semitransparent’ for a subtle difference.
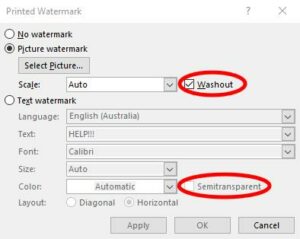
Here’s the difference in results:
![]()
Add to Selected Pages
If you don’t want a watermark on the title page, you can go into the header and select ‘Different First Page.’

If you don’t want a watermark on various pages, this can be achieved within one document:
Example: no watermark for title and contents page.
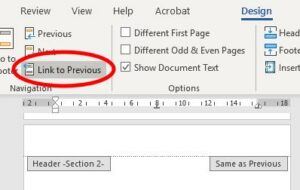
Firstly, you need to break your document into sections:
- Layout tab → Breaks → select ‘Next Page.’
- Go to the header section of the page you want a watermark on → double click on the header (or Insert tab → Header → Edit Header.
- Where ‘Link to Previous’ is highlighted, deselect it.
- Go to the Design tab and insert the watermark.

Odd and Even Pages
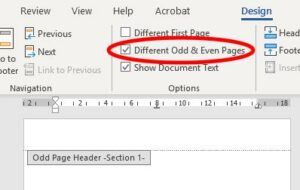
You can set your watermark for every second page and adjust the text.
Example: change ‘draft’ on every second page to ‘final copy’
- Add your ‘Draft’ watermark.
- Double click on the header → in the top ribbon, select ‘Different Odd & Even Pages.’
- Design tab → Watermark → Custom Watermark → in the text box, type in ‘final copy’ (see video for results).
Change Watermark on a Specific Page
Sometimes you might need a different watermark for a specific page.
Example: label last page ‘urgent’ and previous pages ‘confidential.’
- Add the watermark ‘Confidential’ to all your pages.
- Create a section break for the last page (as per the example above).
- Go to the last page that requires a different watermark
- Double click on the header and move your cursor over the text to get the cross icon → right-click → Edit Text.
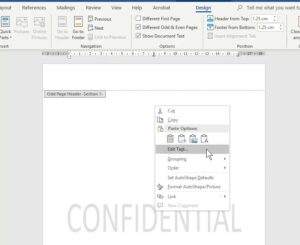
This displays a popup box that allows you to change the text, font, size, and format. (See video for results).

Add a Watermark to Columns
By default, a watermark appears singular in the center of your page. This can be frustrating when working with columns. But the solution is as simple as copy and paste.
Example: change watermark from a single page to multiple columns within the page
- Insert a watermark text/logo as per usual.
- Go into the header → click on the image → resize logo using the grey handles and place it in the left column.
- With the logo still selected, press Ctrl C to copy → Ctrl V to paste → move the second image to the right column.
See video for a demonstration.
There are many different ways to position the logo. For example, to bring it forward:
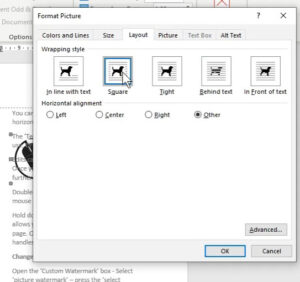
Right-click and select ‘Format Autoshape/Picture’ → Layout tab → select the square option.
In ‘Custom Watermark’ untick washout for a darker effect.
Here are the results:
See video for detailed demonstrations of watermark designs in columns.
Troubleshooting
To remove the watermark:
Design tab → Watermark → Remove Watermark. Or go to the header, click on the image, and press delete.
If the watermark isn’t printing correctly:
Go to Custom Watermark → untick the semitransparent box. Or you can adjust the watermark itself using the same steps as adjusting a logo.
If you experience issues changing the text for a specific page:
- Open a new document and insert the watermark you want to use.
- Double click the header and select the text. When you see the grey handles, press Ctrl C or right-click and select copy.
- Return to your document and double-click the header. Select the current watermark and delete.
- Press Ctrl V or right-click and select paste. Double click to exit the header mode.
>> Want some more handy tips? Check out 12 Cool MS Word Tricks You Need to Know! <<

1 thought on “MANIPULATE WATERMARKS IN MICROSOFT WORD TO SUIT YOU”