

Creating a form or survey? Then learn how to add check boxes in Word, a very handy tool to make your forms more professional.
What Are Check Boxes?
They’re boxes you can display on your document to indicate responses to questions/statements. The user has the option to tick which box best represents their response. They can be used for simple ‘Yes’ ‘No’ answers or a number of different choices.
For example:
Do you live in Australia?
☐ Yes ☐ No
Select your subscription preference:
☐ Send me monthly newsletters
☐ Include me in weekly insight emails
☒ Subscribe me to everything
☐ Unsubscribe me
Advantages of Check Boxes
The problem with today’s technology is we’re bombarded with competing information, ads, and banners. Our concentration span has decreased, and our time is more limited.
With forms, people respond better to check boxes and multiple-choice rather than open-ended questions. Other advantages are:
- less time consuming to complete
- can give you more accurate answers than vague open-ended responses
- cuts down the number of text boxes for open-ended questions
- you can create an unlimited number of responses
- eliminates problems trying to read illegible handwriting
- makes the document more scannable and inviting to participate.
Example of Open-Ended Questions Vs Check Boxes:

How to Add Check Boxes in Word
There are three methods, depending on the purpose of your document.
Method 1: Insert Symbol
This method is for visual purposes only (e.g. print outs). If you want a check box that a person can tick electronically, see method 3.
1. Place your cursor where you want a check box.
2. Insert tab → Symbol → More symbols.

3. In the Font drop-down list, select ‘Wingdings’
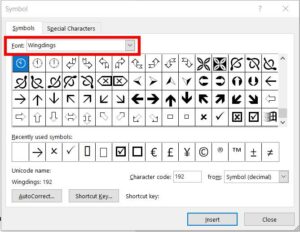
4. In this list, you can select:
An empty box symbol

Or a box with a tick (or cross)

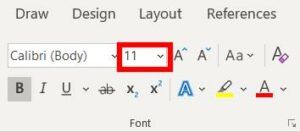
5. You can change the size of the box by adjusting the font size.
This icon will remain in the Symbol quick menu for future use.

Method 2: Define New Bullet
Visual purposes only (e.g. print outs). For an electronic check box, see method 3.
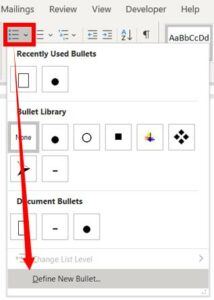
- Place your cursor where you want a check box.
- Click on the bullet drop-down arrow (in Paragraph group).
- Define new bullet → Symbol.
4. Select the box symbol → Ok.
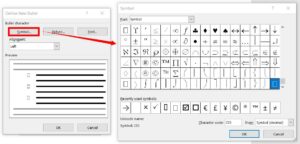
It will now show on your bullets list for future use.
Method 3: Developer Tab
You can add electronic check boxes using the Developer tab. This allows someone to tick the box onscreen.
To add the Developer tab:
File tab → Options → Customize Ribbon → Develop tab (from Main Tabs list).
1. The Developer tab will appear in the top ribbon next to View Tab.
2. In the Controls group, click on the ‘Check Box Content Control’ button.

This symbol will appear:
☐
If you click on it with your mouse, it will mark the box with an X.
☒
You can change the size of the box by adjusting the font size.
More formatting tips:

I know how to create a checkbox for printing/visual purposes but I didn’t know that it could be created within MSWord for online purposes. That’s definitely a bonus! I’m learning a lot about MS Word through your posts, thanks ?
Great Tamika, I’m so glad you’re finding these helpful 🙂