

Hanging indents are important for page layout, particularly with referencing and academic writing. Follow these simple processes on how to do hanging indent:
- Insert and modify hanging indent
- Use for APA, CMS, or MLA styles
- Remove hanging indent
Also learn how to move whole paragraphs, first line only, and set tabs.
What is a Hanging Indent?
It’s the indentation of the second (and following) lines of text in a paragraph. So, visually, only the first line is aligned with the left margin. It is also referred to as a negative indent or hanging paragraph.
Example:

Why Use Hanging Indents?
Hanging indents provide visual cues so readers can skim references and find information quickly. They’re commonly used for bibliographies, reference pages, and scripts. Bullet-points and numbered lists automatically include this feature.
Academic papers include a lot of citations. When writing academically, hanging indents are required for these styles:
- APA (American Psychological Association)
- MLA (Modern Language Association)
- CMS (Chicago Manual of Style)
Click here to learn more about these writing formats.
How to do Hanging Indent
There are several ways you can do this:
Keyboard Shortcut
1. Place your cursor on the text/paragraph you want to indent.
2. Press Ctrl+T → this takes it to the next tab stop (the first being 1.27cm).
Right-Click
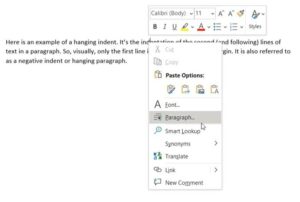
1. Place your cursor on the text/paragraph you want to indent.
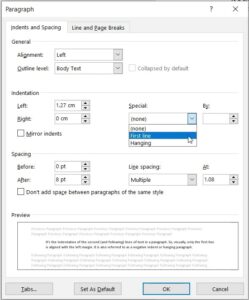
2. Right-click → Paragraph.
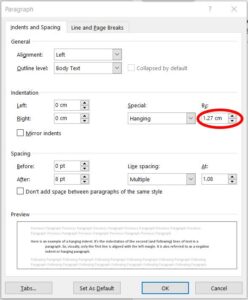
3. In the pop-up box, go to ‘Indentation.’
4. In the Special drop-down list, select ‘Hanging.’
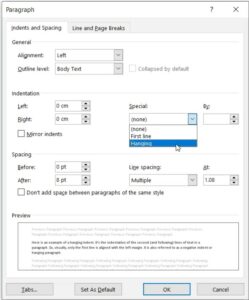
5. You can also adjust the indentation size if you wish.
Note: by default, it’s already set to the standard size for APA, MLC & CMS styles (1.27cm or ½ inch).
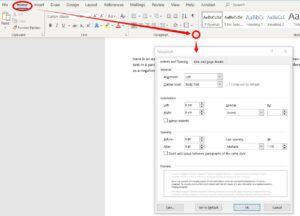
Paragraph Settings
On the home page, go to the ‘Paragraph’ Group and select the small square/arrow icon in the corner. This brings up the same pop-up box.
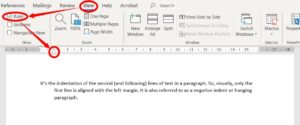
Ruler
- Go to View → tick the ‘Ruler’ check box.
- Highlight the text you want to indent.
- Slide the bottom triangle inwards to create your indent.
How to Change or Remove a Hanging Indent
To change indents, just modify the indent settings in the ‘Paragraph’ pop-up box. Or adjust the slider in the ruler.
To remove:
Go to the ‘Paragraph’ box → Special → select ‘None.’ Or place your cursor at the start of the text and press backspace.
Other Indents
Whole Paragraph
To indent the entire paragraph, there are Increase/Decrease buttons located in the Paragraph group (Home tab).
Or you can use the Ruler and move the top and bottom triangles together.

First Line
Indents to the first line are common for fiction. You can access this in the ‘Paragraph’ box too.
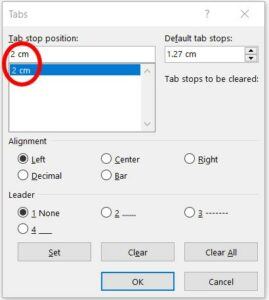
Or you can set tabs via the tab button (located in the bottom left corner of the ‘Paragraph’ box). Type your indent size in ‘Tab Stop Position.’
Note: default tab stop is already set to 1.27cm.
You can view the tab in the ruler (looks like an ‘L’ symbol). You can slide this anywhere along the ruler to adjust.

General Alignment
There are general alignment tools you can use too. These change your entire text position on the page. Place your cursor at the beginning of the text (or highlight) and go to the Paragraph group in the Home tab.

Use any of these buttons:
Align left – Ctrl+L
Align center – Ctrl+E
Align Right – Ctrl+R
Justify (box text) – Crtl+J
Simple Yet Effective
Displaying your references in a clear format makes your document more practical and visually appealing. Using hanging indents is a simple step that can make a big difference to your reader’s experience.
More Helpful Tutorials:


1 thought on “HOW TO DO HANGING INDENT – MS WORD”