

Word art can add a creative touch to your documents, making them visually appealing and engaging. Microsoft offers a variety of tools and features to help you easily design stunning word art. Whether you’re working on a presentation, flyer, or invitation, learning how to design Word Art can make a big impact.
Why use Word Art?
Visual appeal plays a crucial role in capturing the attention of your audience and conveying your message effectively. By incorporating word art into your documents, your designs can make key information stand out, create emphasis, and add a touch of creativity.
Word art has become increasingly popular in design for various purposes, from marketing materials to educational resources. It is used by students, professionals, and hobbyists alike.
Microsoft has a user-friendly interface with a range of design options, making it easy to elevate your documents with custom word art that suits your style and purpose.
Accessing Word Art in Microsoft Word
To enhance your work with creative text designs, Microsoft offers a feature called Word Art. In Microsoft Word, you can easily access Word Art to make your text stand out.
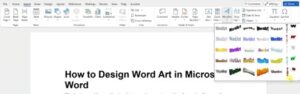
How to Design Word Art in MS Word on Windows
To access Word Art in Microsoft Word on Windows:
1. Open your document
2. Click on ‘Insert’ tab → click on ‘WordArt’ (in text group)
3. Select the style you prefer
4. A text box will appear where you can type the text you want to transform into Word Art.
5. You can further customize this by changing the font, size, colour, and effects.
How to Design Word Art in MS Word on Mac
Accessing Word Art in Microsoft Word on Mac follows a similar process with slight differences.
1. Open your document.
2. Click the ‘Insert’ menu at the top → select ‘WordArt’ from the options provided
3. Select the style you prefer
4. Enter the text you want to convert into Word Art and explore the various styles and effects available.
By following these steps on both Windows and Mac, you can easily access the Word Art feature. Experiment with different styles to make your text pop and capture the reader’s attention effortlessly.
How to Design Word Art – Custom Design
Let’s explore how you can create custom Word Art:
Choosing a Word Art Style
When you design Word Art in Microsoft Word, you have access to various Word Art styles from the WordArt gallery on the Insert tab. These styles range from simple and elegant to bold and dynamic, giving you a range of options that best suit your document’s tone and message. Experiment with different styles to find the perfect fit for your content and make it visually engaging.
Applying Text Effects
To add flair to your Word Art, you can apply text effects such as shadows, reflections, and 3D rotations. Shadows create a sense of depth, reflections add a touch of sophistication, and 3D rotations bring a new dynamic to your text. To ensure you pick effects that complement your design, consider the mood and theme of your document, and your type of readership.
Adjusting Word Art Layout
Adjusting the layout of your Word Art is crucial for achieving the best design. You can resize, rotate, and reposition the text to create a visually appealing arrangement. Resize the text to make it prominent or subtle, rotate it for a unique angle, and position it strategically within your document. These adjustments can elevate the overall look of your Word Art and make it more impactful.
Customizing Word Art in Microsoft Word allows you to play with font styles, colours, effects, and layout options. Have fun experimenting with different combinations to find the perfect custom Word Art that will captivate your readers.
For more information on creating and customizing Word Art in Microsoft Word, you can refer to the Microsoft WordArt Tools guide.

How to Design Word Art and Incorporate in Documents
By creatively combining Word Art with other design elements, you can create even more engaging documents.
Best Practices for Word Art Integration
When using Word Art in documents, you must consider the placement, size, and colour schemes to ensure it seamlessly integrates with the overall design. Here are some recommendations to enhance the effectiveness of your Word Art:
Placement – Position your Word Art strategically to draw attention to important text or headings within the document. Avoid overcrowding sections with Word Art to maintain readability. Learn about the importance of whitespaces and the eye’s natural movement patterns.
Size – Adjust the size of the Word Art to make it visually impactful while staying proportional to the rest of the content. Experiment with different sizes to find the right balance. Remember, you want it to still look professional.
Colour Schemes – Choose colours that complement the document’s theme and background. Contrasting colours can make the Word Art pop but ensure readability by selecting hues that blend harmoniously.
Combining Word Art with Other Design Elements
Consider integrating Word Art with other design elements. Here are some creative ways to do this with images, shapes, and more:
Images – Incorporate Word Art into images to add context or captions. Overlaying text on images can create a striking visual effect.
Shapes – Use shapes as backgrounds for Word Art to make it more prominent. Experiment with different shapes and text layouts for a unique design.
Design Elements – Combine Word Art with icons, borders, or patterns to create a cohesive visual theme. Play around with layering effects to enhance the overall presentation.
By following these best practices and exploring creative combinations, you can effectively utilise Word Art to engage your audience.
This video will give you more inspiration and tips on how to design Word Art:
Saving and Sharing Word Art
Word Art creations in Microsoft Word can be saved and shared to showcase your creativity or collaborate with others. Understanding how to save and share Word Art is essential to ensure your designs are accessible to a wider audience.
Saving Word Art
Follow these simple steps to save your Word Art in Microsoft Word:
- To save your Word Art as an image file, right-click on the Word Art design and choose ‘Save as Picture.’ This allows you to save your creation in formats like JPEG or TIFF.
- Another method to save your Word Art is by taking a screen capture of the design and pasting it into an image editor. You can then edit and save the Word Art as an image file.
- To ensure you don’t lose your work, it’s advisable to save your Word document regularly by pressing ‘Ctrl + S.’ This safeguards your Word Art along with the entire document.
Sharing Word Art
Here are ways to share your Word Art creations with friends, colleagues, or on social media platforms:
Save as Image File: Save your Word Art as an image file and share it via email, messaging apps, or social media platforms. It allows others to view and appreciate your designs effortlessly.
Embed in Documents: You can embed your Word Art creations in presentations, reports, or other documents to enhance visual appeal and convey your message effectively.
Print and Display: Print your Word Art designs and display them in your workspace, home, or events to showcase your creativity and add a personal touch to the surroundings.
Take Your Document to the Next Level
By mastering the art of word art in Microsoft, you can unlock new possibilities for expressing your ideas and presenting information in a compelling way. Follow these steps on how to design Word Art and get creative experimenting with different styles. Having the skills to design captivating word art can set your work apart and leave a lasting impression on your audience.
Looking for Other design Ideas? Check out these useful posts: